xboxscene.org forums

Pages: 1 ... 8 9 [10] 11 12 ... 18

Author Topic: Project Wetbox Wip  (Read 4599 times)

haloloser

  • Archived User
  • Full Member
  • *
  • Posts: 215
Project Wetbox Wip
« Reply #135 on: October 16, 2005, 10:58:00 AM »

i didnt know what they meant, but i knew that stuff was really greasy.  im sure eminvil can vouch for that stuff probably being good enough to serve the purpose.  thanks for the advice  because ill go look for it.  i got the beeswax from walmart in the hair section.
Logged

haloloser

  • Archived User
  • Full Member
  • *
  • Posts: 215
Project Wetbox Wip
« Reply #136 on: October 17, 2005, 07:06:00 PM »

i got back from the barrial today.  it wasnt quite as bad as i thought it would be.  i spent the majority of the car ride reading harry potter, so instead of doing schoolwork when i got home, i worked a little bit.  ive been intertaining this idea in my head for a while now, and i finally got to it today.  i didnt spend alot of time taking the pictures becase the back  still needs lots of work.  this is what i have so far, and it looks pretty dang good, or at least i think so.

user posted image
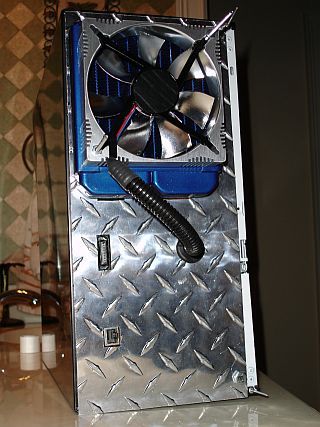
i just test fit the fan today.  it took me forever to come up with a mounting scheme, but im pleased with the way it turned out.  like i said its not complete yet, but  it gets the point across.

user posted image
another shot.  kinda sideways.  i think the sleeving and the rubber grommet just pulled it together.

user posted imageuser posted image
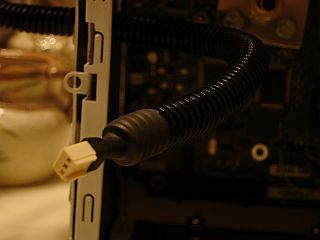
not even macro helped this picture in the light so i took  one in the dark.  its amazing what a simple wire sleave, and some heat shrink can do it add to the look.

user posted image
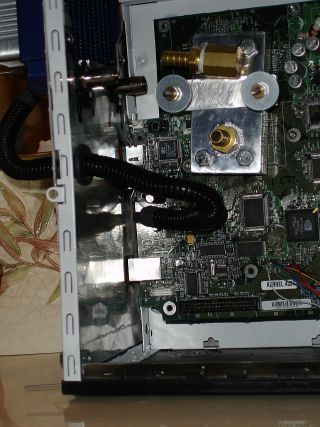
this was the worste pic, but it was meant to be a teaser.  the waterblock is upside down in the picutre.  i would leave it this way, but in order not to have to rebuild the back panel i have to flip it so that the top barb from the waterblock and radiator will match with a 90 degree elbow.  ill hopefully have more to post tomorrow.  keep the comments comming.  i love to hear what you guys think.

-haloloser-
Logged

bosstitan187

  • Archived User
  • Full Member
  • *
  • Posts: 227
Project Wetbox Wip
« Reply #137 on: October 17, 2005, 07:33:00 PM »

TIGHT!
Logged

dougMod

  • Archived User
  • Hero Member
  • *
  • Posts: 1029
Project Wetbox Wip
« Reply #138 on: October 18, 2005, 07:41:00 AM »

looks like a nice clean job.
Logged

haloloser

  • Archived User
  • Full Member
  • *
  • Posts: 215
Project Wetbox Wip
« Reply #139 on: October 18, 2005, 08:31:00 AM »

thanks guys.  it really does feel like its starting to come together.  if i could get that freakin side panel painted and finished i would be in buisness.  im probably going to work on some minor things today, and ill have some stuff posted later on.

dougmod, man its good to see you back.  i thought that almost all of the older members had abandoned the site, but i still see them every now and again.  i have to admit its very reassuring.

i wish i had a video camcorder, but i do not.  usually the only technology that we acquire around this house is the  stuff i ask for.  like i said i wish i had one, but i have other things that i need more.  its  more practical for me to get a new computer right now because im not a big movie maker.  now, a video capture card; thats something i need!
Logged

Shoo Box

  • Archived User
  • Jr. Member
  • *
  • Posts: 87
Project Wetbox Wip
« Reply #140 on: October 18, 2005, 08:53:00 AM »

QUOTE(C89ZX7R @ Oct 18 2005, 04:36 PM)
pointer , a video camcorder won't turn a UV led blue
Logged

jameschatz

  • Archived User
  • Jr. Member
  • *
  • Posts: 90
Project Wetbox Wip
« Reply #141 on: October 18, 2005, 09:18:00 AM »

Yer wat the hell was the point in screwing up this post wiv sum random piece of crap.

And even if a camcorder doesnt make the uv leds blue its picture quality is horrible and i wud much rather hav a cleaner pic wivblue leds than that picture

Anyways back on topic haloloser ur box is looki wicked cant wait to see it finished
Logged

Granulated

  • Archived User
  • Sr. Member
  • *
  • Posts: 434
Project Wetbox Wip
« Reply #142 on: October 18, 2005, 09:55:00 AM »

Wow. I haven't checked on this since page 2 or so, but I think my jaw hit the floor...great work!
Logged

Apprentice modder

  • Archived User
  • Full Member
  • *
  • Posts: 111
Project Wetbox Wip
« Reply #143 on: October 18, 2005, 10:36:00 AM »

love.gif
Logged

thedominor

  • Archived User
  • Jr. Member
  • *
  • Posts: 54
Project Wetbox Wip
« Reply #144 on: October 18, 2005, 11:53:00 AM »

biggrin.gif
Logged

ninjax

  • Archived User
  • Sr. Member
  • *
  • Posts: 352
Project Wetbox Wip
« Reply #145 on: October 18, 2005, 04:24:00 PM »

beerchug.gif
Logged

V1GiLaNtE

  • Archived User
  • Jr. Member
  • *
  • Posts: 78
Project Wetbox Wip
« Reply #146 on: November 13, 2005, 07:32:00 PM »

Wow i should be studying for my chemistry test but this is just fucking amazing..if i fail this test i owe it to YOU..but thats aight cause your mod is sooo pimp
Logged

haloloser

  • Archived User
  • Full Member
  • *
  • Posts: 215
Project Wetbox Wip
« Reply #147 on: November 14, 2005, 02:20:00 AM »

hmmm... maybe ill install some underwater speakers in the res.  that way when i mod my shrinking machine into the case as well, i can hear it when i go swimming in the res hahaha.

i just got back from athens, so tomorrow im going to work on the xbox again.  ill answere a few questions for the time being.

it does actually look like a lot of extra room, but once the pump/res house is completed most of it will be gone.  soooo, i just going to leave it simple.  there will be some of the metal conduit used for wire management and astetics (spelliing), but that will pretty much complete the inside of the case.

the lighting will be a combination of uv and white leds.  im probably going to add a uv cathode too, but i cant put it on the bottum because of the pump house.  it might fit on the top, im just going to have to measure.  expect an update tomorrow.  thanks for the interest and support guys, i really appreciate it!

until next time.

-haloloser-
Logged

haloloser

  • Archived User
  • Full Member
  • *
  • Posts: 215
Project Wetbox Wip
« Reply #148 on: November 14, 2005, 08:36:00 PM »

didnt do a whole lot today.  i actually assmebled my drill press, and messed with it a bit.  i have to say that it is an amazing machine, and will  make a great addition to my workforce.

user posted image
spectacular!!

i didnt really do anything else.  i was trying to work out a way to mount the psu cover.  i finally deicded to bite the bullet, and test to see if ti would work.  here is the result.
user posted image
its a really terrible picture, but you get the idea.  its all mounted.  all i have next is to finish the pump/res house, and attach the drive bay cover.  should be completely finished with the internal fabrication ver soon.

user posted image
i used countersinking machine screws to attach the cover to the previous pc psu support.  this way there will be no screw head to be poking the psu under the cover.  number two, i used accorn head nuts to keep with the theme.  

tomorrow im going to get some allen head machine screws to replace all the hex heads i have on the case.  im gonna  pic up a tap too, so i can complete the little house.  until next time.  

-haloloser-
Logged

llwahooll

  • Archived User
  • Full Member
  • *
  • Posts: 158
Project Wetbox Wip
« Reply #149 on: November 14, 2005, 09:55:00 PM »

good job man and be carefull that drill press lol i had a bad exp with on o those lol
Logged
Pages: 1 ... 8 9 [10] 11 12 ... 18