xboxscene.org forums

Pages: 1 [2] 3 4 ... 18

Author Topic: Project Wetbox Wip  (Read 4596 times)

COTA-GodlyOne

  • Archived User
  • Jr. Member
  • *
  • Posts: 86
Project Wetbox Wip
« Reply #15 on: August 29, 2005, 01:54:00 PM »

just grab a old pc psu and get the converter from the site...tribalmods or w.e its called.
Logged

MakeGalzSayDamn

  • Archived User
  • Newbie
  • *
  • Posts: 18
Project Wetbox Wip
« Reply #16 on: August 29, 2005, 02:09:00 PM »

beerchug.gif - keep us updated mate!
Logged

porsche6714

  • Archived User
  • Jr. Member
  • *
  • Posts: 73
Project Wetbox Wip
« Reply #17 on: August 29, 2005, 02:14:00 PM »

beerchug.gif
Logged

haloloser

  • Archived User
  • Full Member
  • *
  • Posts: 215
Project Wetbox Wip
« Reply #18 on: August 29, 2005, 10:00:00 PM »

my freakin dremel broke today, so i didnt get much accomplished.  i made the custom brackets to hold the back panel of plex on, and test mounted it with a scrap sheet.  ill be ready for the final mount after the i/o's are cut and the paint is finished.  its  gonna have some nice lighting effects too.  ill go buy a dremel tomorrow and get some pics posted.  hopefully i can burrow a friends digi cam becasue the phone pics are really getting old.

user posted image
top left bracked riveted in.  the excess will be removed when i get a new dremel.

user posted image
shot of the middle bracket.

user posted image
this isnt the final mount, i just wanted to get an idea of what i was working with.  ill either mount the radiator on the back window or on the top like a blow hole.

user posted image
another shot.

user posted image
final product will have some nice window trim to give it a proffesional look.  just an idea of what it will look like.
Logged

IAmCanadian

  • Archived User
  • Sr. Member
  • *
  • Posts: 321
Project Wetbox Wip
« Reply #19 on: August 30, 2005, 12:51:00 AM »

smile.gif
Logged

EmTea

  • Archived User
  • Sr. Member
  • *
  • Posts: 367
Project Wetbox Wip
« Reply #20 on: August 30, 2005, 04:23:00 AM »

Looking good.
Keep up the nice work.
Logged

(((XYU)))

  • Archived User
  • Newbie
  • *
  • Posts: 12
Project Wetbox Wip
« Reply #21 on: August 30, 2005, 04:55:00 AM »

beerchug.gif
Logged

haloloser

  • Archived User
  • Full Member
  • *
  • Posts: 215
Project Wetbox Wip
« Reply #22 on: August 30, 2005, 09:47:00 PM »

well, im just using a sumbersable pond/aquarium pump i found on ebay.  its called a jebao, im sure its something generic, but it serves its purpose well.  its specs are as follows.

Model    PP-388
Type    Submersible
Size    2.10" x 2.0" x 2.4"
GPH (gallons per hour)    200
Approx. Max. Head Lift    5 ft
Watts (115v/60h)    12
Discharge Size    5/8" OD
Recommended Tubing Size    5/8" ID
Power Cord Length    6 ft
Manufacturers Warranty    1 Year

this is an image of it.  its so compact it was awsome for its purpose.  i absolutely love it.

user posted image

salemoreforless is the seller with 99.3 % positive feedback.

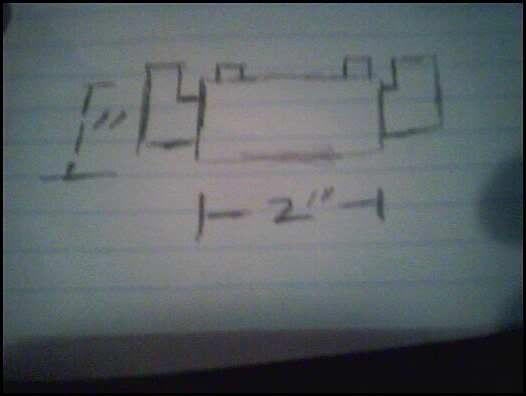
also, my grandfather an i took a good portion of the afternoon figuring out how to design the block.  he though smaller id tubing was the way to go, so we both had to sacrifice a little bit settling with 3/8" id barbs.   with the cpu and its chipset being so close together we decided to go with one large block  instead of two.  since we are using two 1/2" thick bars of 6061 aluminum that will be bolted together i think it will work well, considering this isnt a cutting edge computer or anything.  also we went with one large channel running the length of the block with two outlets on each side.  its a mixture of cross drilling and routing.  ive made a few very rough concept sketches.  

user posted image
top veiw of the  tunneling on the block.  both top and bottum sides will be routed.

user posted image
side view.

user posted image
finally, with the addition of the large block i will have not trouble mounting like i would have with two smaller blocks.  ill just be able to use the existing holes in the mainboard.

in closing, i had to help a friend this evening, so i couldnt get a dremel.  tomorrow ill have to find a 3/8" npt pipe tap so we can complete the blocks hopefully by tomorrow evening.  in addition, i was curious as to how i was going to be able to use an xecutor 3 chip i had installed on a v1.0 that had broken, and the i realized.  the box that i play xbox live on has already had an x2.6 on it.  so all ill have to do is add the chip, and reflash a 1.6 bios.  all the apps are already installed.  chances are once i finish the case ill work on a dual hdd mod with a 250gig.  does anyone know how hard it is to reflash a bios like that, or if its even possible?  i usually stay away from the software part of xbox modding.  untill tomorrow hopefully.

-haloloser-
Logged

wanny1

  • Archived User
  • Newbie
  • *
  • Posts: 39
Project Wetbox Wip
« Reply #23 on: August 31, 2005, 08:33:00 AM »

beerchug.gif
Logged

haloloser

  • Archived User
  • Full Member
  • *
  • Posts: 215
Project Wetbox Wip
« Reply #24 on: August 31, 2005, 09:47:00 PM »

well i got some new things today.  after a search of all the local hardware stores i concluded that they didnt have the tap that i needed for the hose barbs, so i called a small local store called albany nut and bolt.  i showed up, gave the dude my barb, and he hooked me up.  this is a tiny update.  hopefully the block will be completely finished tomorrow.

user posted image
when he pulled this chunk of metal from behind the counter i was expecting to pay around 30 bucks only because it was my last resort, but it only ended up being like ten bucks.

user posted image
also picked up a elbow for the block so i dont have to run the hose so close to the board.

user posted image
finally picked up some rca jacks, so i can wire up my hippad so that i can remove it easily without having to desolder it from  the motherboard.

untill next time.

-haloloser-
Logged

bosstitan187

  • Archived User
  • Full Member
  • *
  • Posts: 227
Project Wetbox Wip
« Reply #25 on: September 01, 2005, 04:53:00 AM »

beerchug.gif
Logged

haloloser

  • Archived User
  • Full Member
  • *
  • Posts: 215
Project Wetbox Wip
« Reply #26 on: September 01, 2005, 05:03:00 PM »

my grandad and i began construction on the block today.  didnt get a whole lot done, but its a start.

user posted image
we began with a .5" thick chunk of 6061 aluminum.

user posted image
next we cut two 2"x4" chunks off, and tack welded them together.  this way we could drill four bolt holes in each corner.  they surve two perposes:  1.  to sandwich the blocks together  2. astetics or however you spell it.

user posted image
we drilled the bolt holes, and tapped the bottum portion of the block.  we grinded the weld off, and got a test bolt going on.  looks pretty good.

hopefully by the end of next week i will be leak testing them.  at this point the hose barb holes till need to be drilled and tapped, and the channel needs to be milled out.  im going to work on the hippad, and maybe i might get to positioning the controller ports tonight.  ill post more pics later.  untill next time, dont buy gas unless you dont have to.

-haloloser-

Logged

mr. newbie

  • Archived User
  • Jr. Member
  • *
  • Posts: 85
Project Wetbox Wip
« Reply #27 on: September 01, 2005, 06:03:00 PM »

howd you get that case green in the 1st post?
Logged

aepuppetmaster

  • Archived User
  • Sr. Member
  • *
  • Posts: 306
Project Wetbox Wip
« Reply #28 on: September 01, 2005, 07:07:00 PM »

i love what ur doing, let me first start off by saying, but i have 1 question, why not copper.  i mean i think ur doing a great job with  the heat sink but if ur goin to go all out and do the job why not make it out of copper.  the 2 reasons i can think of are 1) price and 2) workablity, i have no machining skills but im thinkin maybe it would be hella harder to work with or sumtin? also how are u making the heat sink, are u gunna drill tube fittings and grind out tracks in the bottom block and then sandwich and weld them together?  but again, great work.
- puppetmaster
Logged

haloloser

  • Archived User
  • Full Member
  • *
  • Posts: 215
Project Wetbox Wip
« Reply #29 on: September 01, 2005, 08:02:00 PM »

well, ill start of by saying that the case was green like that when i got it.  its some integrated drive trey for dummies or something.  its so that you can just slide the drive in instead of screwing it in.  i wish it wasnt there because its making my job harder mounting the xbox drive now.  im probably going to remove it when i paint it, im just not sure yet.  i know the case is going to be a high gloss black, but im still contemplating on the chassi.

as for the aluminum.  when i first concieved this project it was because i had all kind of extra parts laying around, and this case was just begging for some kind of mod.  in the beginning this was supposed to be a low budget learning experience for my upcoming pc mod.  well, this has turned into a full blown project now.  keeping with the low budget i talked to my grandad about a month or more ago about building something to cool a computer, showing him examples with copper.  he said they use .5" thick aluminum where he works sometimes, so he checked for me and they had a large piece he saved for me.  aluminum actually conducts better then copper (only by a few degrees), and its almost as soft.  so with it being free, and it being able to conduct relatively the same, i went with it.  

there will be one large channel running through the center of the block with two 3/8" id hose barbs are each end.  when the block is finished being rounted a layer of plumbers goop will be applied to the inside of both the top and bottum blocks, and finally sandwiched together using the bolts in the four corners.  

user posted image
this is a pic of the lcd laying beside the rca jacks.  i used one for video and its ground, and another for 12v and its ground.  i wont be posting any pictures untill at least tuesday.  hope you enjoy.

a final teaser.

user posted image
dont mind the evo x, it wont be that way for long.
Logged
Pages: 1 [2] 3 4 ... 18